Friday, May 25, 2007

Grassy How-To


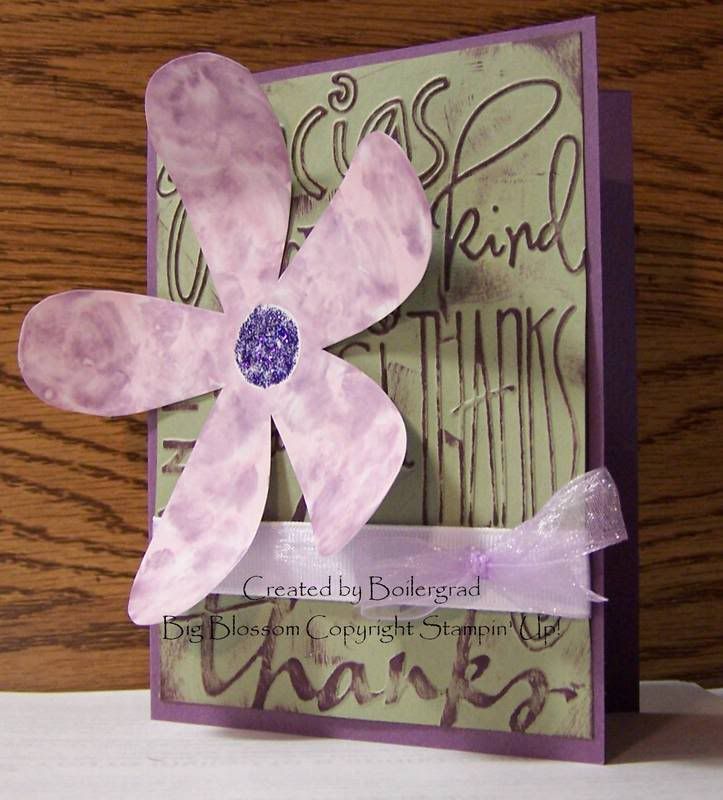
I've had a few people who were intrigued by how I made the grassy background on the card in my post earlier this week. So, I thought I'd make a similar card and create a picture tutorial for you all.


First, start out with a 4" x 5.25" rectangle in a light green color. I used Certainly Celery. You'll need at least two colors of green inkpads as well, one light and one darker. I used Certainly Celery and Old Olive. Open your lighter green inkpad and using only the edge of one side, swipe it down your card from top to bottom. I like to hold the paper in my left hand and the inkpad in the other, but you could do it with the paper laying on the table. If you do it that way, make sure you've protected your table surface. Continue swiping the edge of the inkpad down the length of the card, allowing for some lines to be diagonal and some a bit straighter.

Imagine how grass looks in your yard. As it grows up, some blades overlap one another and they don't all lean the same direction. The same look should be replicated in the swiped ink on your card. After you have filled your paper with "grass," you can use the same technique to make a few flower stems and leaves. You'll want the length and width of your lines to be somewhat proportioned to the size of the flower image you plan on using. In my example, I swiped two flower stems and added two leaves on each stem.


After you have done your grass and stems, you can add your flower blossoms and other card embellishments. In my example, I used the large flower from Stampin' Up!'s Delight in Life set. I stamped it with Staz-On ink on glossy white paper. Then, I highlighted the centers and edges of the petals with wax from a white birthday candle. After that, I used my brayer to apply Yo-Yo Yellow ink to the entire blossom. Then, I used a tissue to wipe the excess ink off of the blossoms. That left me with a white area highlighted on each petal. I was very happy with the outcome of this technique!


Sunday, May 20, 2007

Not Flowers


This weekend was the Virtual Stamp Night at Splitcoaststampers. Virtual Stamp Night is actually an entire weekend devoted to fun challenges. There's a new one posted every hour. This month's VSN focused on flowers, and my favorite challenge from the weekend was to make flowers out of something that isn't a flower. We could use anything we wanted, it just couldn't have any actual flower shapes.

I chose to make my flowers from hearts printed with butterflies. The heart stamp is from Close to My Heart's "You and Me" set. I stamped it on Pretty in Pink paper using Ruby Red ink, repeating the same image in a circle to make it look like flower petals. Then, I cut out the entire heart flower and added a silver rhinestone to the center for a little sparkle.

I distressed the Certainly Celery paper with Certainly Celery and Old Olive ink. I simply rubbed the edge of an ink pad in a stripe down the paper. The Certainly Celery ink is supposed to be grass, and the Old Olive ink is the stem and leaves of the flowers. Then, I added the cut out heart flowers to the Certainly Celery paper using dimensional adhesive.

Thursday, May 17, 2007

Wonderful Watercoloring


I think making watercolor cards is so much fun, and it really gets the creative juices flowing. I first got the idea to do this from Kittie747 at Splitcoaststampers. She has some awesome watercolor cards in her gallery. I have developed my own style and technique for watercoloring that is similar, but a little different than others I've seen. I tend to make my watercolors a bit more vivid than most people.

Here are the supplies you will need:
Reinkers, watercolor brush, blender pen, stamps, permanent ink such as Staz-on, permanent black pen, watercolor pencils, water, white paper 4" x 5.25"

First, I use Staz-on and a black permanent pen to ink the portion of the stamps that I want to use for my landscape. I stamp the page, keeping distance in mind. Smaller images in the back, larger ones in the front. In my picture, you can see the trees, cows, and flowers are stamped in such a way that they show distance. After stamping, I doodle the remaining elements of the landscape. In this case, I drew lines for a couple of hills, and pieces of grass around the flowers.

After all of my elements are stamped and drawn, I can begin watercoloring. I start with the large areas, the grass and sky. First, I place a drop of reinker on the the lid of the coordinating inkpad. You could do this on a plastic lid or a tray of some sort instead. Then, I dip my watercolor brush into my cup of water. With my wet brush, I pick up some of the reinker color from my lid. You'll see that the water will dilute the reinker in the lid. I like to have some of it very diluted and some of it not diluted much at all, so I try not to blend the reinker and water in the lid too much. I start with the lighter areas, and brush the diluted reinker ink onto my paper. I always try to make sure that my brush isn't too wet, or the paper will really curl and wrinkle. As I'm brushing the ink on the page, I make sure that I'm using strokes that match the curves of the land and match the cloud design I want in the sky. This way, as I add more and more strokes, I end up with lots of highlights and lowlights.

After I'm done brushing the large areas, I use watercolor pencils to color in the more detailed stamped and doodled areas, such as the cows, flowers, and tree trunk in my picture. Then, I use a blender pen and water to blend the colors. I use the blender pen instead of a brush because I can get into finer detailed places with the pen.

When all of the details have been colored, I add any desired sentiment panels (the blue "like to udder" panel on mine) or other embellishments. I try to keep the extra embellishments simple so as not to detract from the watercoloring.

You can see my final product below. I really hope you try this technique sometime... it really gets the creative juices flowing!


Wednesday, May 16, 2007

Nothing like a great challenge


There's nothing better than a really interesting sketch challenge at Splitcoaststampers. Today's challenge involved two triangular pieces that are met in the middle by a square piece. I had great fun with this one! I used Basic Grey Blush designer paper for my triangles, and I matted it with brown cardstock. The edges of the brown cardstock were cut with wavy scissors to give an interesting look to the matting. The Pretty In Pink cardstock in the background was dry embossed with the D'vine Swirl Cuttlebug embossing plate. Then, I swiped Pretty in Pink ink over the embossed areas. The brads are really faux brad stickers that I've been getting in $1 packets at JoAnn's. They are awesome, because they give the look of brads without having to mess with punching! The layered flowers were cut with the Asterisks Cuttlebug dies. They are cut from brown cardstock and Basic Grey's Lily Kate paper. The flowers and the sentiment panels are popped on dimensionals.

The second card that I made for the challenge is for an old college friend who is getting married in a couple of weeks. This sketch challenge really reminded me of a dress, so I thought it would be the perfect sketch to make a wedding dress card from. The card base is Basic Black and is, once again, Cuttlebug embossed. I swiped pearlescent lavender ink over the embossed areas for a little elegant shine. The dress is made from vellum, and I highlighted the embossed areas underneath the dress with "icicle" Stickles on top of the vellum. The bouquet is a circle punched from Perfect Plum cardstock. I layered a couple of green paper leaves and three Prima flowers on top of the circle. Then, I added "gold" Stickles to the centers of the flowers. I really hope my friend and his new bride enjoy the card.

Sunday, May 13, 2007

Simple challenge


Friday's challenge at Splitcoaststampers was to create a card with lots of open space. Ordinarily, I'd fill open space with something like dry embossing or doodling. But, I couldn't do it on this card. For me, creating simple cards is a real challenge. So this challenge really took me out of my comfort zone. I used a set of stamps that was new to me, and it was my first attempt at using some Close to My Heart stamps (the hearts with butterflies). I got them from AmyJo at ScrapinUtopia, and I'm pleased with how they worked. They are clear stamps, and it was nice to be able to see where I was stamping!
I used masking to layer one heart behind another, and I doodled the border, faux stitching, and balloon strings. The "happy" stamp is from Stampin' Up's! "So Very" set.

Thursday, May 10, 2007

How and when to plant

It is still VERY risky to plant at this time of year. Much of Indiana has to wait until mid-May for the average frost-free date, and even then, that is only an average. Frost can still come much later than that! My area of Northern Indiana has been known to get frosts in June, and on very rare occasion, July! So, the fact that I planted 3 flats of flowers yesterday, may not have been particularly smart. But, I have lots of sheets for covering them in the event is does get cold again.
One thing that I like to do when planting anything is to make sure the roots aren't too root bound before planting. You'll know if a plant is root bound by taking the plant out of the container and examining the roots. If they wrap around the root ball of the plant, then they are root bound. The petunias I bought yesterday were a little root bound (see roots wrapped around the bottom of the root ball), so I needed to break up the roots a little bit before planting them. Breaking up the roots is called "teasing." I prefer to do this by hand, but other people like to use a tool such as a pocket knife.


The general process of teasing the roots went like this: First, I gently pulled on the roots that were wrapped around the plant. I ended up breaking some off and tearing a few in half. This is perfectly fine. In fact, breaking some of the roots can help to stimulate root growth after it is planted. Of course, breaking too many can kill the plant! After gently tugging on the roots, I spread them out a little bit. I set the plant into it's hole, and gently filled the dirt in around it. I used my hand to pat the dirt lightly to prevent the plant from falling over. Stamping on the ground with your foot around your plants can compact the soil in such a way that it hinders a plants ability to drink and breathe.

I have planted many flowers with teased roots and un-teased roots, but the ones with the teased roots almost always perform better in my flower beds. The ones that weren't teased were especially likely to pop out of the ground if they were disturbed by critters or kids!
Here is a great reference from Purdue University for when and how to plant many popular annual flowers. http://www.hort.purdue.edu/ext/HO-080.pdf

And here's another Purdue publication with more detailed planting and care tips. http://www.hort.purdue.edu/ext/HO-99W.pdf

Amazing growth

There has been an amazing amount of plant growth in my yard since I last posted a picture. The hostas and ferns have almost completely leafed out, the bleeding hearts have recovered from the cold snap, and my red twig dogwood is starting to bloom. My hydrangeas are pretty slow to bounce back from the cold snap, but they are starting to show a little growth again. I also started planting Impatiens yesterday. It's still risky to plant cold-sensitive plants, and I may very well be out $40, but I'm willing to chance it. In our area, it's possible to have frost in June and even July, but I have lots of sheets to cover the plants with if it happens to get cold again.

A foggy morning

Tuesday, May 1, 2007

Stamps - an economical way to scrapbook


As any scrapper knows, paper and embellishments can get pretty expensive. But, if you use stamps to create your own backgrounds and embellishments, you can get a lot more bang for your buck!

The photo to the left shows an example of how you can make a really fun scrapbook page without spending a lot of money on extra embellishments. I used Stampin' Up!'s Big Blossom stamp to create the background flowers. Then, I added brown punched circles to the centers. You can see that I also made two Big Blossom images that I cut out and adhered to the page. I doodled faux stitching along the edges of both of these. On the far left flower, I put a 3 in the center and things my daughter enjoys on all of the petals. The caterpillar is made from circles punched from pink paper, and I used an alphabet stamp set to make her name. The caterpillar face, antennae, and feet are all hand doodled. The brown matting is where I'll be putting her photo.

The Big Blossom and alphabet stamps can be used over and over on many different pages, and you can achieve different looks with them by using different colors and stamp techniques. The initial cost of the stamp is often more pricey than the average scrapbook embellishment, but the amount of use you get from it makes up for it over time.

Here is an example of another way to use the Big Blossom stamp to achieve a very different look. This look is very easy using the "Faux Shaving Cream" technique, which is explained here:
http://stampsandflowers.blogspot.com/2007/04/faux-shaving-cream.html