Friday, November 9, 2007

Simple Christmas

With all the busy stuff going on in my life, I really need to maximize my time. So, I'm not able to spend excessive amounts of time making my Christmas cards this year. One simple way to make really nice looking cards, really fast, is to use patterned paper. There are lots of gorgeous patterned papers in the craft stores, and one of my favorite lines of paper is Basic Grey. I've used Basic Grey's "Fruitcake" line to make the cards shown here.

The snowman cards used Basic Grey designer paper, Stampin's Up!'s "Merry" stamp set, and Stickles glitter glue.

The ornament and tree card used Basic Grey designer paper, My Favorite Things and Stampin' Up! stamps, gel pens, colored pencils, and Stickles glitter glue.

The striped card used Basic Grey designer paper, Stampin' Up!'s Ruby Red cardstock and ink, and red and lime green Stickles glitter glue. The striped card also has a video tutorial that goes along with it. The dimensions of the paper and supplies are as follows:

White cardstock base: 5.5"x8.5"
Striped paper: 5.25"x4"
Ruby Red cardstock: 3.25"x2.25"
Holly paper: 3"x2"

Paper trimmer
Ticket corner punch
Double-sided tape
3-D round Zots (dimensional adhesive)
Gold gel pen
Red Stickles
Lime Green Stickles

Sunday, August 5, 2007

Christmas card eye candy

Here are some of the Christmas cards I've been making lately. I'm trying to get a few done here and there so I'm not in a rush when the holidays come. I start back to work full time tomorrow, so I won't have as much time to make cards as I did last year! Here's hoping that by starting early, I'll have them all done with very little stress.


Friday, July 27, 2007

The wonders of summer


Every year, I'm just absolutely floored at how beautiful hydrangea bushes are. They have quickly become my favorite flower, and I have six of them in my yard now. My latest acquisition (see photos at left) is "Limelight." It is a hydrangea paniculata, which is just one of several types of hydrangeas you can buy. Paniculatas bloom on new wood, which means they can sustain a bit more pruning than some of the other types of hydrangea. They can be pruned heavily in late winter, but you can leave some of the stronger woody stems intact in order to support the large blossom clusters.


My next hydrangea purchase will be a hydrangea quercifolia, which is also known as the oak-leaf hydrangea. The flowers are generally a bit less showy on the oak-leaf hydrangeas, however the foliage is absolutely gorgeous. The leaves are large and are lobed similarly to oak leaves. Their crowning beauty is their autumn leaf color.

Sunday, July 8, 2007

Shirts and ribbons

I've been ridiculously busy lately. I can't believe it's almost been a month since I last posted here! So sorry! Here is the shirt folding tutorial I promised. I decided to try my hand at a video tutorial for this. A college friend of mine recommended that I do some video blogging, so this is my first attempt. I have the shirt tutorial and flat ribbon tutorial posted here today.

Shirt Tutorial


Ribbon Tutorial

Tuesday, June 12, 2007

Origami Father's Day


Last week's technique challenge at Splitcoaststampers was to make a card with a folded shirt on it. What a fun way to make a Father's Day card! Folding the shirt was a piece of cake once I read the technique challenge thread found at Splitcoast. I will update my blog with a tutorial of my own very soon!

The base of the card is Basic Black cardstock, with a brown panel on the front. The green panels, tie, and pocket are Old Olive, and the Old Olive squares are mounted on Creamy Caramel cardstock. I doodled faux stitching on the shirt and on the edges of the panels. The "DAD" was stamped with a typeset alphabet stamp set. The "loved" was from Stampin' Up!'s "So Very" stamp set. I handwrote the "is" using a silver gel pen.


Another Father's Day card I made was inspired by the Featured Stamper challenge at Splitcoaststampers. It was based on a design by Stamps4funinCA found here.

I created the striped panel down the left side of the card using the same technique I use to make grass on cards. The flowers are Primas and I added a faux brad sticker to the center of each one. The faux brads are also on the blue "Happy" and "Day" panels. The tree is from Stampin' Up!'s "Lovely as a Tree" set. It was stamped in Creamy Caramel ink, and colored with Stampin' Write makers in Apricot Appeal, Certainly Celery, Sage Shadow, and Mellow Moss.

I've been a little lax in updating things here due to lots of changes going on in my life. I've recently found myself single again and am searching for a teaching job! I've already had one interview and have another one tomorrow, so keep your fingers crossed for me!

Tuesday, June 5, 2007

Squares, squares, everywhere!


I was inspired by Splitcoaststamper's color challege today. The challenge was to use Eggplant Envy, Certainly Celery, and Ruby Red in a card. I don't have the Eggplant color, so I used Perfect Plum instead.
Since Certainly Celery was one of the colors, I thought it was the perfect chance to make a graduation card for a theatre friend of mine. Her favorite color is green, and she's fond of the number four. So, I used squares in my layout (since she likes 4, I figured squares would be great). There are four squares: two in perfect plum, one in ruby red, and one in white. There are also four square brad stickers in the bottom corner and four dots of Stickles in the top corner. So, I really put some thought into this one! The stamps are all from Stampin' Up!. The background grapevine is from "Stippled Celebrations" and the main image and sentiment are from "Measure of a Life." The saying is from Eleanor Roosevelt and reads "The future belongs to those who believe in the beauty of their dreams." I thought that was a PERFECT sentiment for a graduation card, especially when it's for a dear friend of mine who I know will do great things in her life.

Friday, May 25, 2007

Grassy How-To


I've had a few people who were intrigued by how I made the grassy background on the card in my post earlier this week. So, I thought I'd make a similar card and create a picture tutorial for you all.


First, start out with a 4" x 5.25" rectangle in a light green color. I used Certainly Celery. You'll need at least two colors of green inkpads as well, one light and one darker. I used Certainly Celery and Old Olive. Open your lighter green inkpad and using only the edge of one side, swipe it down your card from top to bottom. I like to hold the paper in my left hand and the inkpad in the other, but you could do it with the paper laying on the table. If you do it that way, make sure you've protected your table surface. Continue swiping the edge of the inkpad down the length of the card, allowing for some lines to be diagonal and some a bit straighter.

Imagine how grass looks in your yard. As it grows up, some blades overlap one another and they don't all lean the same direction. The same look should be replicated in the swiped ink on your card. After you have filled your paper with "grass," you can use the same technique to make a few flower stems and leaves. You'll want the length and width of your lines to be somewhat proportioned to the size of the flower image you plan on using. In my example, I swiped two flower stems and added two leaves on each stem.


After you have done your grass and stems, you can add your flower blossoms and other card embellishments. In my example, I used the large flower from Stampin' Up!'s Delight in Life set. I stamped it with Staz-On ink on glossy white paper. Then, I highlighted the centers and edges of the petals with wax from a white birthday candle. After that, I used my brayer to apply Yo-Yo Yellow ink to the entire blossom. Then, I used a tissue to wipe the excess ink off of the blossoms. That left me with a white area highlighted on each petal. I was very happy with the outcome of this technique!


Sunday, May 20, 2007

Not Flowers


This weekend was the Virtual Stamp Night at Splitcoaststampers. Virtual Stamp Night is actually an entire weekend devoted to fun challenges. There's a new one posted every hour. This month's VSN focused on flowers, and my favorite challenge from the weekend was to make flowers out of something that isn't a flower. We could use anything we wanted, it just couldn't have any actual flower shapes.

I chose to make my flowers from hearts printed with butterflies. The heart stamp is from Close to My Heart's "You and Me" set. I stamped it on Pretty in Pink paper using Ruby Red ink, repeating the same image in a circle to make it look like flower petals. Then, I cut out the entire heart flower and added a silver rhinestone to the center for a little sparkle.

I distressed the Certainly Celery paper with Certainly Celery and Old Olive ink. I simply rubbed the edge of an ink pad in a stripe down the paper. The Certainly Celery ink is supposed to be grass, and the Old Olive ink is the stem and leaves of the flowers. Then, I added the cut out heart flowers to the Certainly Celery paper using dimensional adhesive.

Thursday, May 17, 2007

Wonderful Watercoloring


I think making watercolor cards is so much fun, and it really gets the creative juices flowing. I first got the idea to do this from Kittie747 at Splitcoaststampers. She has some awesome watercolor cards in her gallery. I have developed my own style and technique for watercoloring that is similar, but a little different than others I've seen. I tend to make my watercolors a bit more vivid than most people.

Here are the supplies you will need:
Reinkers, watercolor brush, blender pen, stamps, permanent ink such as Staz-on, permanent black pen, watercolor pencils, water, white paper 4" x 5.25"

First, I use Staz-on and a black permanent pen to ink the portion of the stamps that I want to use for my landscape. I stamp the page, keeping distance in mind. Smaller images in the back, larger ones in the front. In my picture, you can see the trees, cows, and flowers are stamped in such a way that they show distance. After stamping, I doodle the remaining elements of the landscape. In this case, I drew lines for a couple of hills, and pieces of grass around the flowers.

After all of my elements are stamped and drawn, I can begin watercoloring. I start with the large areas, the grass and sky. First, I place a drop of reinker on the the lid of the coordinating inkpad. You could do this on a plastic lid or a tray of some sort instead. Then, I dip my watercolor brush into my cup of water. With my wet brush, I pick up some of the reinker color from my lid. You'll see that the water will dilute the reinker in the lid. I like to have some of it very diluted and some of it not diluted much at all, so I try not to blend the reinker and water in the lid too much. I start with the lighter areas, and brush the diluted reinker ink onto my paper. I always try to make sure that my brush isn't too wet, or the paper will really curl and wrinkle. As I'm brushing the ink on the page, I make sure that I'm using strokes that match the curves of the land and match the cloud design I want in the sky. This way, as I add more and more strokes, I end up with lots of highlights and lowlights.

After I'm done brushing the large areas, I use watercolor pencils to color in the more detailed stamped and doodled areas, such as the cows, flowers, and tree trunk in my picture. Then, I use a blender pen and water to blend the colors. I use the blender pen instead of a brush because I can get into finer detailed places with the pen.

When all of the details have been colored, I add any desired sentiment panels (the blue "like to udder" panel on mine) or other embellishments. I try to keep the extra embellishments simple so as not to detract from the watercoloring.

You can see my final product below. I really hope you try this technique sometime... it really gets the creative juices flowing!


Wednesday, May 16, 2007

Nothing like a great challenge


There's nothing better than a really interesting sketch challenge at Splitcoaststampers. Today's challenge involved two triangular pieces that are met in the middle by a square piece. I had great fun with this one! I used Basic Grey Blush designer paper for my triangles, and I matted it with brown cardstock. The edges of the brown cardstock were cut with wavy scissors to give an interesting look to the matting. The Pretty In Pink cardstock in the background was dry embossed with the D'vine Swirl Cuttlebug embossing plate. Then, I swiped Pretty in Pink ink over the embossed areas. The brads are really faux brad stickers that I've been getting in $1 packets at JoAnn's. They are awesome, because they give the look of brads without having to mess with punching! The layered flowers were cut with the Asterisks Cuttlebug dies. They are cut from brown cardstock and Basic Grey's Lily Kate paper. The flowers and the sentiment panels are popped on dimensionals.
The second card that I made for the challenge is for an old college friend who is getting married in a couple of weeks. This sketch challenge really reminded me of a dress, so I thought it would be the perfect sketch to make a wedding dress card from. The card base is Basic Black and is, once again, Cuttlebug embossed. I swiped pearlescent lavender ink over the embossed areas for a little elegant shine. The dress is made from vellum, and I highlighted the embossed areas underneath the dress with "icicle" Stickles on top of the vellum. The bouquet is a circle punched from Perfect Plum cardstock. I layered a couple of green paper leaves and three Prima flowers on top of the circle. Then, I added "gold" Stickles to the centers of the flowers. I really hope my friend and his new bride enjoy the card.

Sunday, May 13, 2007

Simple challenge


Friday's challenge at Splitcoaststampers was to create a card with lots of open space. Ordinarily, I'd fill open space with something like dry embossing or doodling. But, I couldn't do it on this card. For me, creating simple cards is a real challenge. So this challenge really took me out of my comfort zone. I used a set of stamps that was new to me, and it was my first attempt at using some Close to My Heart stamps (the hearts with butterflies). I got them from AmyJo at ScrapinUtopia, and I'm pleased with how they worked. They are clear stamps, and it was nice to be able to see where I was stamping!
I used masking to layer one heart behind another, and I doodled the border, faux stitching, and balloon strings. The "happy" stamp is from Stampin' Up's! "So Very" set.

Thursday, May 10, 2007

How and when to plant

It is still VERY risky to plant at this time of year. Much of Indiana has to wait until mid-May for the average frost-free date, and even then, that is only an average. Frost can still come much later than that! My area of Northern Indiana has been known to get frosts in June, and on very rare occasion, July! So, the fact that I planted 3 flats of flowers yesterday, may not have been particularly smart. But, I have lots of sheets for covering them in the event is does get cold again.
One thing that I like to do when planting anything is to make sure the roots aren't too root bound before planting. You'll know if a plant is root bound by taking the plant out of the container and examining the roots. If they wrap around the root ball of the plant, then they are root bound. The petunias I bought yesterday were a little root bound (see roots wrapped around the bottom of the root ball), so I needed to break up the roots a little bit before planting them. Breaking up the roots is called "teasing." I prefer to do this by hand, but other people like to use a tool such as a pocket knife.


The general process of teasing the roots went like this: First, I gently pulled on the roots that were wrapped around the plant. I ended up breaking some off and tearing a few in half. This is perfectly fine. In fact, breaking some of the roots can help to stimulate root growth after it is planted. Of course, breaking too many can kill the plant! After gently tugging on the roots, I spread them out a little bit. I set the plant into it's hole, and gently filled the dirt in around it. I used my hand to pat the dirt lightly to prevent the plant from falling over. Stamping on the ground with your foot around your plants can compact the soil in such a way that it hinders a plants ability to drink and breathe.

I have planted many flowers with teased roots and un-teased roots, but the ones with the teased roots almost always perform better in my flower beds. The ones that weren't teased were especially likely to pop out of the ground if they were disturbed by critters or kids!
Here is a great reference from Purdue University for when and how to plant many popular annual flowers. http://www.hort.purdue.edu/ext/HO-080.pdf

And here's another Purdue publication with more detailed planting and care tips. http://www.hort.purdue.edu/ext/HO-99W.pdf

Amazing growth

There has been an amazing amount of plant growth in my yard since I last posted a picture. The hostas and ferns have almost completely leafed out, the bleeding hearts have recovered from the cold snap, and my red twig dogwood is starting to bloom. My hydrangeas are pretty slow to bounce back from the cold snap, but they are starting to show a little growth again. I also started planting Impatiens yesterday. It's still risky to plant cold-sensitive plants, and I may very well be out $40, but I'm willing to chance it. In our area, it's possible to have frost in June and even July, but I have lots of sheets to cover the plants with if it happens to get cold again.

A foggy morning

Tuesday, May 1, 2007

Stamps - an economical way to scrapbook


As any scrapper knows, paper and embellishments can get pretty expensive. But, if you use stamps to create your own backgrounds and embellishments, you can get a lot more bang for your buck!

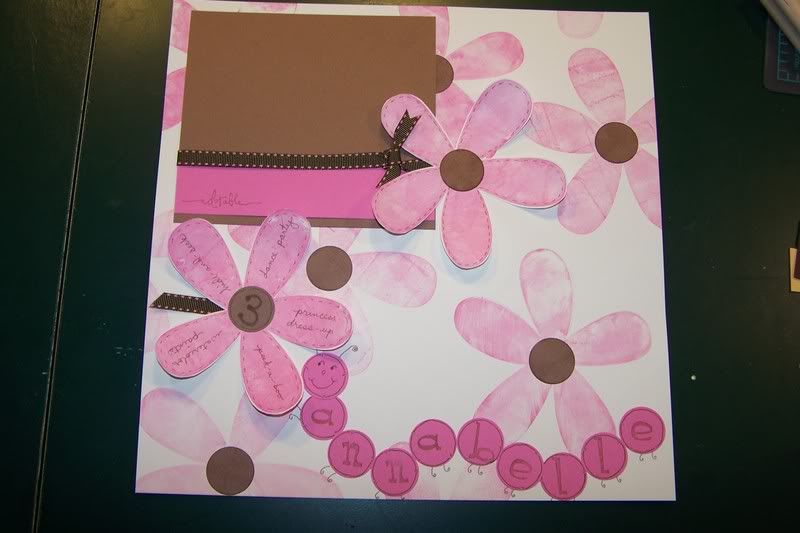
The photo to the left shows an example of how you can make a really fun scrapbook page without spending a lot of money on extra embellishments. I used Stampin' Up!'s Big Blossom stamp to create the background flowers. Then, I added brown punched circles to the centers. You can see that I also made two Big Blossom images that I cut out and adhered to the page. I doodled faux stitching along the edges of both of these. On the far left flower, I put a 3 in the center and things my daughter enjoys on all of the petals. The caterpillar is made from circles punched from pink paper, and I used an alphabet stamp set to make her name. The caterpillar face, antennae, and feet are all hand doodled. The brown matting is where I'll be putting her photo.

The Big Blossom and alphabet stamps can be used over and over on many different pages, and you can achieve different looks with them by using different colors and stamp techniques. The initial cost of the stamp is often more pricey than the average scrapbook embellishment, but the amount of use you get from it makes up for it over time.

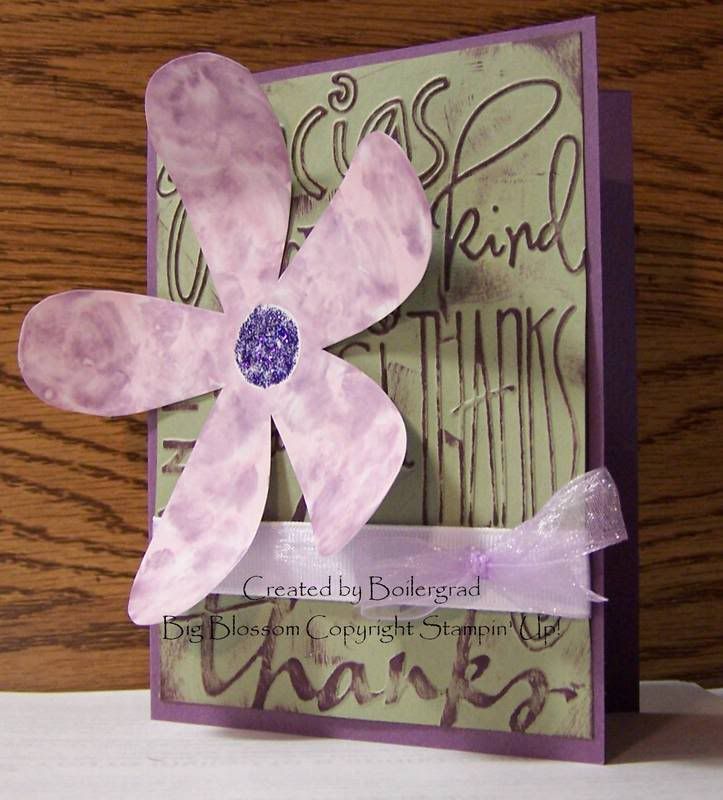
Here is an example of another way to use the Big Blossom stamp to achieve a very different look. This look is very easy using the "Faux Shaving Cream" technique, which is explained here:
http://stampsandflowers.blogspot.com/2007/04/faux-shaving-cream.html

Monday, April 30, 2007

Weeds!

I've had a ridiculous amount of weeds to deal with this spring. It's probably mainly due to the fact that I have very little mulch protection in a couple of my beds. The weed seeds just fall and germinate. It's awful! I wanted to knock out as many weeds as possible before my plants started to leaf out. I didn't want the weeds to shade my good bedding plants! Mulch can be a good weed preventer since it restricts access to the soil. Plants in your garden beds and lawn grass that is cut at 3.5" tall, help to shade the dirt and prevent weed seed germination.
I love how green things are getting in my lawn and garden now, and I can't hardly wait until they have leafed out completely! The photo below shows my backyard and shady garden as of today. You can see ferns and hostas and other plants are really starting to grow now. I'll post another picture in a week or two so you can see the progress!

Poppin' Pastels Part II


A few days ago, I posted instructions for the traditional Poppin' Pastels technique. Here is another way to do it using the same supplies (see supplies below). Ink your stamp with Versamark or Embossing Ink. Then, quickly turn your stamp over and apply the chalk directly to the stamp. You can color different parts of the stamp different colors. For example, in my photo, I colored the flower petals with Orchid Opulence chalk and the flower center with YoYo Yellow. After coloring the stamp, huff on it and stamp it onto your paper.

It gives you a similar effect as before, except you don't see the chalk on the paper around the image. You only see color on the stamped image itself!

Thursday, April 26, 2007

Poppin' Pastels Tutorial

One great way to utilize a wide variety of colors, without buying the inkpads, is to use a technique called "Poppin' Pastels." You use pastels or chalk and Versamark or embossing ink for this technique.

The first thing you need to do is gather all of your materials. You'll have to work quickly once you get started, so you won't have time to hunt for materials. If your craft area is as messy as mine, it could take a while to find something!

I use a Q-tip to apply my pastels, but you could use another applicator such as a stiff paint brush. I also have my pastels, the stamp I want to use, and my Versamark pad handy. I have a small white square of paper that I'll be working with.

The first step is to stamp your image using the Versamark or embossing ink. I stamped mine over the entire square, but depending on the look you want, you may only need to stamp once. In either case, it pays to move quickly so the ink doesn't have the chance to dry before applying the chalk.

This brings us to the next step, chalk application. Simply rub your Q-tip (or other applicator) over the pastel square of the color of your choice.

Then, brush the Q-tip over the stamped area. You'll see the chalk (in my case Orchid Opulence) cover the paper, but it will show up very bright where you stamped your image. This is why it's called "poppin' pastels." The stamped area almost pops off the page!


After you have covered the entire stamped image or images, wipe the excess chalk off of the paper with a tissue.

After that, you can embellish the paper any way you want. Then, simply add it to your card!


Finished Product

Wednesday, April 25, 2007

Sketch of the day


As you may have read before, the Sketch Challenge over at Splitcoaststampers is my favorite one every week. This week was no different! This weeks challenge used one large background panel, another big panel offset to the left side, and another small item in the lower right hand corner of the big panel. I used Basic Grey's Blush and Lily Kate papers on my card. I doodled the brown and green panels to match the leaves and stems on the Lily Kate paper. The Blush Basic Grey paper has been sponged with Mellow Moss ink. I just love how soft and sweet this card turned out!

Tuesday, April 24, 2007

Spring inspired

We've been having some beautiful weather here in Northern Indiana the past few days. Temps have been warm, and the sun has been shining! All of the plants are starting to grow, and some of the early blooming plants are showing their color. This wonderful weather inspired a very springy floral card.

I used the Cuttlebug D'vine Swirl embossing folder to emboss the Barely Banana panel. Then, I swiped Certainly Celery ink over the top. The panel that the triple layered Prima flowers are attached to is Barely Banana paper that has been sponged with Pretty in Pink ink. It gave the paper a sort of apricot hue, which blended with the Prima flowers nicely. The Prima flowers are all attached with pewter brads, which have lime green stickles (glitter glue) on top. Lime green and Icicle stickles also adorn the edges of several panels.

The "Levi Tab" is made from Barely Banana cardstock and was stamped with Old Olive ink and sponged with Pretty in Pink ink. The "in life" text comes from Stampin' Up's "Delight in Life" stamp set, which the word "delight" on the green panel and the leaf behind the triple flower are from Stampin' Up's "Paint Prints."

Perennial divisions


In my area, Zone 5 of Northern Indiana, now is a great time for dividing perennials. It is really easy to find ideal spots for your divisions as the plants are sending up their shoots (see photo to right). For example, in my yard, I have lots of hostas. Hostas need to be divided every few years in order to perform well in the landscape. Due to their size and fairly delicate leaves, Hostas can be difficult to divide in the fall; although they can be divided in either the fall or spring. I prefer to do mine in the spring since it's so much easier.
By looking straight down onto a Hosta plant that needs to be divided, you will usually see some clumps of leaf shoots. They are often like small circles (see photo to left). In order to divide them up nicely, you will need to dig up the entire plant. First, be sure to remove any debris in and around the plant. You'll see in my photos, that fallen leaves litter the plant. They should be removed before starting this process. Start by digging a circle around the entire plant with your shovel. Your circle should be a few inches away from the edge of the plant. Then, use your shovel to gently lift the plant and all of it's roots. Once your plant is loose, you can use a shovel, spade, or other flat garden tool to divide the clumps. Simply slice through the plant, top to bottom, in the desired areas. Then, you can lift the divided clumps and plant them in new places or give them to friends. I planted mine in a new place in my shady garden, and then added a slow release fertilizer (see photo below). Regular water is also very important, as it is with any newly planted plant.