Showing posts with label stampin' up. Show all posts
Showing posts with label stampin' up. Show all posts
Wednesday, September 28, 2011
Masking tutorial
Summer is winding down, but you can still create summery cards to brighten someone's day. In this tutorial, you'll learn how to use masking to lay one image on top of another without letting colors bleed or blend. Then, you'll follow the assembly of the rest of the card.
Tuesday, June 12, 2007
Origami Father's Day

Last week's technique challenge at Splitcoaststampers was to make a card with a folded shirt on it. What a fun way to make a Father's Day card! Folding the shirt was a piece of cake once I read the technique challenge thread found at Splitcoast. I will update my blog with a tutorial of my own very soon!
The base of the card is Basic Black cardstock, with a brown panel on the front. The green panels, tie, and pocket are Old Olive, and the Old Olive squares are mounted on Creamy Caramel cardstock. I doodled faux stitching on the shirt and on the edges of the panels. The "DAD" was stamped with a typeset alphabet stamp set. The "loved" was from Stampin' Up!'s "So Very" stamp set. I handwrote the "is" using a silver gel pen.
 Another Father's Day card I made was inspired by the Featured Stamper challenge at Splitcoaststampers. It was based on a design by Stamps4funinCA found here.
I created the striped panel down the left side of the card using the same technique I use to make grass on cards. The flowers are Primas and I added a faux brad sticker to the center of each one. The faux brads are also on the blue "Happy" and "Day" panels. The tree is from Stampin' Up!'s "Lovely as a Tree" set. It was stamped in Creamy Caramel ink, and colored with Stampin' Write makers in Apricot Appeal, Certainly Celery, Sage Shadow, and Mellow Moss.
I've been a little lax in updating things here due to lots of changes going on in my life. I've recently found myself single again and am searching for a teaching job! I've already had one interview and have another one tomorrow, so keep your fingers crossed for me!
Friday, May 25, 2007
Grassy How-To

I've had a few people who were intrigued by how I made the grassy background on the card in my post earlier this week. So, I thought I'd make a similar card and create a picture tutorial for you all.
First, start out with a 4" x 5.25" rectangle in a light green color. I used Certainly Celery. You'll need at least two colors of green inkpads as well, one light and one darker. I used Certainly Celery and Old Olive. Open your lighter green inkpad and using only the edge of one side, swipe it down your card from top to bottom. I like to hold the paper in my left hand and the inkpad in the other, but you could do it with the paper laying on the table. If you do it that way, make sure you've protected your table surface. Continue swiping the edge of the inkpad down the length of the card, allowing for some lines to be diagonal and some a bit straighter.
 Imagine how grass looks in your yard. As it grows up, some blades overlap one another and they don't all lean the same direction. The same look should be replicated in the swiped ink on your card. After you have filled your paper with "grass," you can use the same technique to make a few flower stems and leaves. You'll want the length and width of your lines to be somewhat proportioned to the size of the flower image you plan on using. In my example, I swiped two flower stems and added two leaves on each stem.

After you have done your grass and stems, you can add your flower blossoms and other card embellishments. In my example, I used the large flower from Stampin' Up!'s Delight in Life set. I stamped it with Staz-On ink on glossy white paper. Then, I highlighted the centers and edges of the petals with wax from a white birthday candle. After that, I used my brayer to apply Yo-Yo Yellow ink to the entire blossom. Then, I used a tissue to wipe the excess ink off of the blossoms. That left me with a white area highlighted on each petal. I was very happy with the outcome of this technique!

Sunday, May 20, 2007
Not Flowers

This weekend was the Virtual Stamp Night at Splitcoaststampers. Virtual Stamp Night is actually an entire weekend devoted to fun challenges. There's a new one posted every hour. This month's VSN focused on flowers, and my favorite challenge from the weekend was to make flowers out of something that isn't a flower. We could use anything we wanted, it just couldn't have any actual flower shapes.
I chose to make my flowers from hearts printed with butterflies. The heart stamp is from Close to My Heart's "You and Me" set. I stamped it on Pretty in Pink paper using Ruby Red ink, repeating the same image in a circle to make it look like flower petals. Then, I cut out the entire heart flower and added a silver rhinestone to the center for a little sparkle.
I distressed the Certainly Celery paper with Certainly Celery and Old Olive ink. I simply rubbed the edge of an ink pad in a stripe down the paper. The Certainly Celery ink is supposed to be grass, and the Old Olive ink is the stem and leaves of the flowers. Then, I added the cut out heart flowers to the Certainly Celery paper using dimensional adhesive.
Wednesday, May 16, 2007
Nothing like a great challenge

There's nothing better than a really interesting sketch challenge at Splitcoaststampers. Today's challenge involved two triangular pieces that are met in the middle by a square piece. I had great fun with this one! I used Basic Grey Blush designer paper for my triangles, and I matted it with brown cardstock. The edges of the brown cardstock were cut with wavy scissors to give an interesting look to the matting. The Pretty In Pink cardstock in the background was dry embossed with the D'vine Swirl Cuttlebug embossing plate. Then, I swiped Pretty in Pink ink over the embossed areas. The brads are really faux brad stickers that I've been getting in $1 packets at JoAnn's. They are awesome, because they give the look of brads without having to mess with punching! The layered flowers were cut with the Asterisks Cuttlebug dies. They are cut from brown cardstock and Basic Grey's Lily Kate paper. The flowers and the sentiment panels are popped on dimensionals.
 The second card that I made for the challenge is for an old college friend who is getting married in a couple of weeks. This sketch challenge really reminded me of a dress, so I thought it would be the perfect sketch to make a wedding dress card from. The card base is Basic Black and is, once again, Cuttlebug embossed. I swiped pearlescent lavender ink over the embossed areas for a little elegant shine. The dress is made from vellum, and I highlighted the embossed areas underneath the dress with "icicle" Stickles on top of the vellum. The bouquet is a circle punched from Perfect Plum cardstock. I layered a couple of green paper leaves and three Prima flowers on top of the circle. Then, I added "gold" Stickles to the centers of the flowers. I really hope my friend and his new bride enjoy the card.
Tuesday, May 1, 2007
Stamps - an economical way to scrapbook
As any scrapper knows, paper and embellishments can get pretty expensive. But, if you use stamps to create your own backgrounds and embellishments, you can get a lot more bang for your buck!
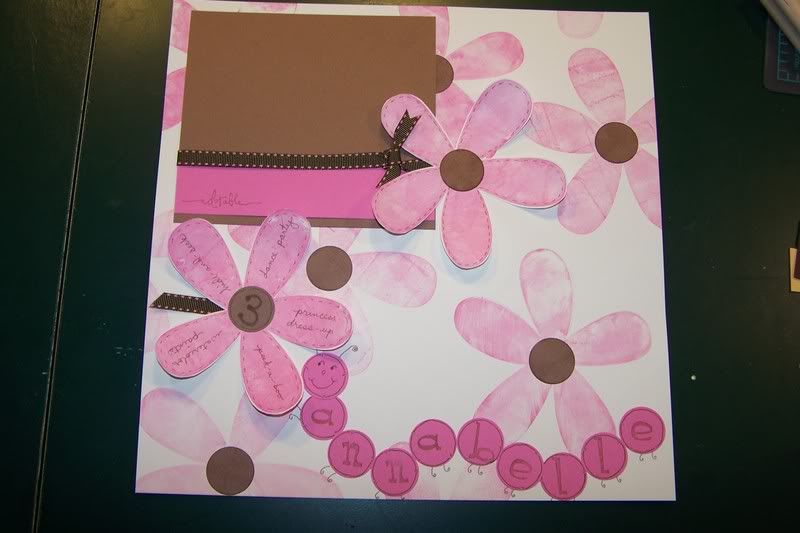
The photo to the left shows an example of how you can make a really fun scrapbook page without spending a lot of money on extra embellishments. I used Stampin' Up!'s Big Blossom stamp to create the background flowers. Then, I added brown punched circles to the centers. You can see that I also made two Big Blossom images that I cut out and adhered to the page. I doodled faux stitching along the edges of both of these. On the far left flower, I put a 3 in the center and things my daughter enjoys on all of the petals. The caterpillar is made from circles punched from pink paper, and I used an alphabet stamp set to make her name. The caterpillar face, antennae, and feet are all hand doodled. The brown matting is where I'll be putting her photo.
The Big Blossom and alphabet stamps can be used over and over on many different pages, and you can achieve different looks with them by using different colors and stamp techniques. The initial cost of the stamp is often more pricey than the average scrapbook embellishment, but the amount of use you get from it makes up for it over time.
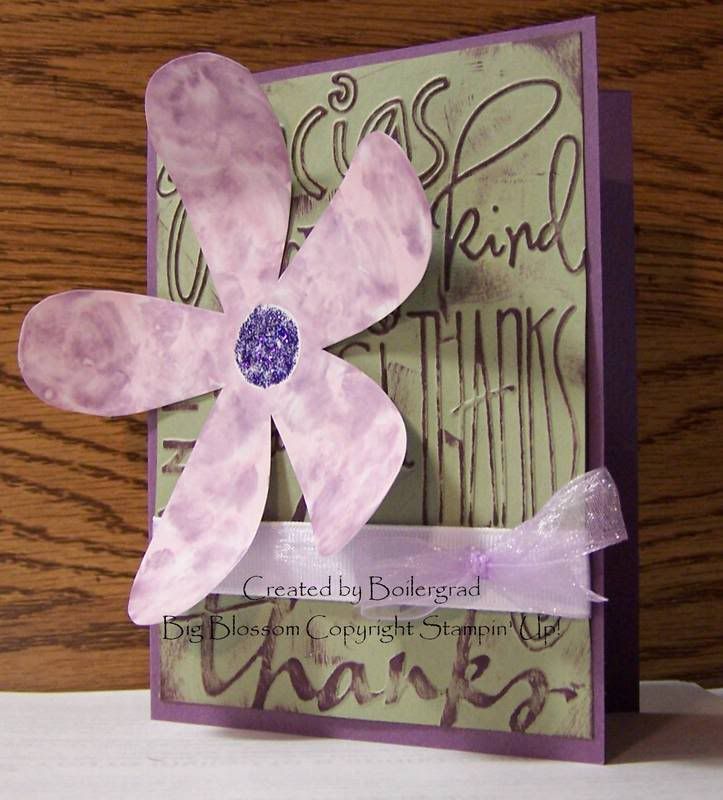
Here is an example of another way to use the Big Blossom stamp to achieve a very different look. This look is very easy using the "Faux Shaving Cream" technique, which is explained here:
http://stampsandflowers.blogspot.com/2007/04/faux-shaving-cream.html
Monday, April 30, 2007
Poppin' Pastels Part II

A few days ago, I posted instructions for the traditional Poppin' Pastels technique. Here is another way to do it using the same supplies (see supplies below). Ink your stamp with Versamark or Embossing Ink. Then, quickly turn your stamp over and apply the chalk directly to the stamp. You can color different parts of the stamp different colors. For example, in my photo, I colored the flower petals with Orchid Opulence chalk and the flower center with YoYo Yellow. After coloring the stamp, huff on it and stamp it onto your paper.
It gives you a similar effect as before, except you don't see the chalk on the paper around the image. You only see color on the stamped image itself!
Tuesday, April 24, 2007
Spring inspired
We've been having some beautiful weather here in Northern Indiana the past few days. Temps have been warm, and the sun has been shining! All of the plants are starting to grow, and some of the early blooming plants are showing their color. This wonderful weather inspired a very springy floral card.

I used the Cuttlebug D'vine Swirl embossing folder to emboss the Barely Banana panel. Then, I swiped Certainly Celery ink over the top. The panel that the triple layered Prima flowers are attached to is Barely Banana paper that has been sponged with Pretty in Pink ink. It gave the paper a sort of apricot hue, which blended with the Prima flowers nicely. The Prima flowers are all attached with pewter brads, which have lime green stickles (glitter glue) on top. Lime green and Icicle stickles also adorn the edges of several panels.
The "Levi Tab" is made from Barely Banana cardstock and was stamped with Old Olive ink and sponged with Pretty in Pink ink. The "in life" text comes from Stampin' Up's "Delight in Life" stamp set, which the word "delight" on the green panel and the leaf behind the triple flower are from Stampin' Up's "Paint Prints."
Thursday, April 19, 2007
Magazine Inspiration

Twisted Chick Creations a.k.a. Flaxychick (see my blog links to the right) challenged her blog readers to use a magazine ad as an inspiration for a card. As I was flipping through my House and Garden magazine, I saw an ad that would be PERFECT! The layers of the appliances immediately stood out as a fun card layout. The font colors (blues and lavender) inspired the color scheme. The font style inspired the swirly Cuttlebugged background (which I rubbed with Lavender metallic ink). The Harlequin style paper is made by My Mind's Eye. I used my "Like it a Latte" stamps for the coffee cup and the sentiment, because it was really the only kitchen related stamp set that I had! The steam for the coffee cup is stamped with Staz-on ink on acetate, and then cut out. I got the idea for that trick from "labullard" at Splitcoaststampers. Thanks for the idea Linda! The blue panel that the sentiment is stamped on is popped using 3-D Zots.
Thanks for the inspiration Flaxychick! I'll definitely be using magazine ads for inspiration again!
Better view of the card.

Better view of the card.
Monday, April 16, 2007
Trifold Card
Wow! This is a really fun style of card to make. Following Beate's tutorial on Splitcoaststampers, makes each step easy. Basically, the process goes like this. Cut a piece of cardstock to 3.5" by 10.5". Score it 3.5" in and 7" in from the left side. This gives you three equal panels. Score diagonals on each of the side panels, making sure they go in the same direction. Fold one square panel in, and then the triangle up. Then, fold the other square in, and then the triangle down. Add your decorative panels and images, and tie it all up with a ribbon. It's so simple and quick! Beate's tutorial (linked above) is much more detailed and shows step by step pictures, so I recommend reading the tutorial if you  plan on making one.
I was inspired by my red and white floral designer paper. I love red and white as a color combo, but I don't typically use it. For some reason, I tend to stick to a softer color pallet. Anyway, I thought this was the perfect excuse to do something a little bit bolder. I used two layers of white Heidi Swapp flowers for my center image. Then, I added orange stickles to the inside of the flower. Stickles are a sparkly glitter glue, are acid free, and are really easy to apply to cards and scrapbook pages for accents. The interior of my card has the small flower image from Stampin' Up!'s Delight in Life set. I stamped it in Ruby Red ink, which matches my Ruby Red cardstock base.
 plan on making one.
I was inspired by my red and white floral designer paper. I love red and white as a color combo, but I don't typically use it. For some reason, I tend to stick to a softer color pallet. Anyway, I thought this was the perfect excuse to do something a little bit bolder. I used two layers of white Heidi Swapp flowers for my center image. Then, I added orange stickles to the inside of the flower. Stickles are a sparkly glitter glue, are acid free, and are really easy to apply to cards and scrapbook pages for accents. The interior of my card has the small flower image from Stampin' Up!'s Delight in Life set. I stamped it in Ruby Red ink, which matches my Ruby Red cardstock base.
Tuesday, April 10, 2007
Coffee beans
This card uses two similar techniques, masking and reverse-maskin g. Masking is a simple technique that allows you to use only part of a stamp for your image. It's handy for layering images in front of one another. In this case, I masked the interior of the coffee cup. I did this by stamping the coffee cup on a scrap piece of paper, cutting the center out, and using that center cut-out to "mask" the center of the stamped image on my pink cardstock. So, when I stamped it, it only showed the outline of the coffee cup. Then, I did reverse masking. I used the other part of the scrap paper that I cut (which had the outline of the cup on it), and used that as a reverse mask. It basically covered the outline of the coffee cup on the pink cardstock, so I could fill in the center with something else. I filled the center with Creamy Caramel sponged ink, and then with coffee beans in Basic Brown. It's a fun technique that I'm sure I'll be using many times over again in the future.
There's an excellent tutorial by Beate at Splitcoaststampers. It shows pictures of how to do this fun technique!
Reverse Masking Tutorial at SCS
 g. Masking is a simple technique that allows you to use only part of a stamp for your image. It's handy for layering images in front of one another. In this case, I masked the interior of the coffee cup. I did this by stamping the coffee cup on a scrap piece of paper, cutting the center out, and using that center cut-out to "mask" the center of the stamped image on my pink cardstock. So, when I stamped it, it only showed the outline of the coffee cup. Then, I did reverse masking. I used the other part of the scrap paper that I cut (which had the outline of the cup on it), and used that as a reverse mask. It basically covered the outline of the coffee cup on the pink cardstock, so I could fill in the center with something else. I filled the center with Creamy Caramel sponged ink, and then with coffee beans in Basic Brown. It's a fun technique that I'm sure I'll be using many times over again in the future.
There's an excellent tutorial by Beate at Splitcoaststampers. It shows pictures of how to do this fun technique!
Reverse Masking Tutorial at SCS
Monday, April 2, 2007
Faux Shaving Cream

What a COOL technique this is! The challenge on SCS today was to make a card using the faux shaving cream technique. Basically, you take a solid image stamp (like Big Blossom on mine) and ink it up with whatever color you choose. Then, you take a smaller image, inked in a different color, and kiss the solid image with it. When you kiss it, you also swirl it a little. This give a really cool, almost tie-dye like, effect.
For my card, I used Big Blossom for the large image, and the medium flower from Paint Prints for the kissing. I used a brayer to ink my Big Blossom in Pretty in Pink ink. Then I kissed it with the Paint Prints flower in Perfect Plum. I used purple stickles to dress up the center of the flower. My background panel is Mellow Moss cardstock that was embossed with my Cuttlebug. I swiped the embossed areas with Perfect Plum ink. The base paper of my card is Perfect Plum.
This card was very fun and easy to make, and the faux shaving cream technique gives a really neat effect!
Subscribe to:
Posts (Atom)